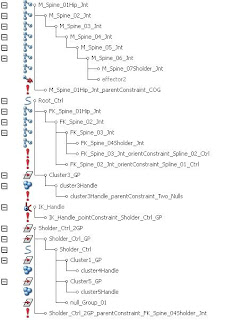
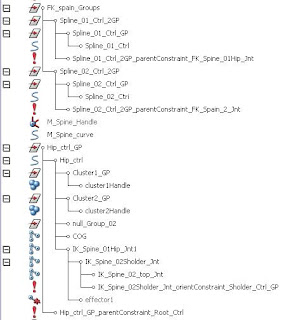
Spine Rigging Process
2. Create 6 Jnts (Total 7) For Main Spine and Set the orientations.
3. Take two Duplicate Sets for IK and FK.
4. Then remove the alternate Jnts of FK set.
5. And remove all Jnts except top and bottom and add one jnt above the top for IK set
6. Add Controls for with proper Shapes and rename all
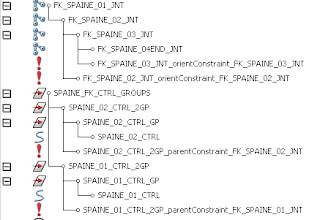
FK Spain Setup
9. Hide all and show only FK Jnts and Ctrls.
10. Select Spain01 Ctrl ---Group it rename it -- and snap the pivot to the center of the jnt .
11. Then Shift select the jnt parent it .
12. Freeze transformations then un parent it (then we will gen Same orientations).
13. Group again then rename it pivot at the below jnt.
14. Same for the Spain02 Ctrl also....
15. Select the Spain01 Ctrl and then center jnt ---apply--Constrain Orient
16. Same for the Spain02 Ctrl also....
17. Select the first FK jnt (Spain FK_01_Jnt) the go to Out liner using Ctrl Key hold select the Spain01 Ctrl second Group constrain Parent it
18. Select the Spain FK_03_Jnt the go to Out liner using Ctrl Key hold select the Spain02 Ctrl second Group constrain Parent it.
19. Group the bouth 2nd groupsof Spain01 Ctrl and Spain02 Ctrl Rename as FK Group
-------------------------------------------------
IK Spine Setup
20. Hide all and show only IK Jnts and Ctrls.
21. Select the Sholder Ctrl group it and put the pivot at the center of the IK shoulder jnt .
22. Select the Shoulder Ctrl group and shoulder jnt parent it
23. Freeze transformations Except Rotations Then un parent it .
24. Create ik handle with RP Solver and rename it .
25. Select the Shoulder Ctrl and IK handle ---Constrain point it .
26. Select the Shoulder Ctrl and Shoulder Jnt --- Constrain Orient with Switch on Maintain Offset In the dialogue Box .
27. Select the Shoulder Ctrl group Again Group it Pivot at the Center of the Jnt
-------------------------------------------------
Shoulder Ctrl and FK Combining Spine Setup
28. Show FK Jnts
29. Select the FK end Jnt then Shoulder Ctrl Second Group ----- Constrain parent
-------------------------------------------------
Main Spline IK Setup
30. Hide all And Show Only Main Jnt
31. Go to IK spline Handel tool set Two Vertexes an Create From M_ Spain02_Jnt to Sholder Jnt (M_ Spain07End_Jnt)
32. Select the curve in the Center Of the Jnts Press Shift P to Un parent from the]
IK spline Handel .And Rename All .
33. Select the Vertexes of that Curve Create Clusters For each Vertex
34. The Select Top two Clusters Parent with the Shoulder Ctrl
35. The Select bottom two Clusters Parent with the Hip Ctrl
36. Then Create Two Null Groups By Pressing “Ctrl+G” Without Any Selection
37. Put the pivots At center Clusters (3rd Cluster) And Select Two Nulls then 3rd Cluster Constrain Parent.
38. Select null1 and Parent with Shoulder Ctrl ,Select null2 Parent with Hip Ctrl
COG Joint Creation
39. Create a Jnt at Root Start Jnt Name as COG
40. Hip Ctrl Pivot at M_ Spain02_Jnt and group it again Pivot at M_ Spain02_Jnt
41. COG Jnt to Hip Ctrl Parent and cog Jnt to M_ Spain01_Jnt Constrain Parent.
42. Root Ctrl to Hip Ctrl Constrain Parent .
43. IK Jnt to Hip Ctrl Normal Parent .
44. Select the 3rd Cluster and Parent With the Root Ctrl


1. Select the M_Spine_curve then go to MEL editor type “arclen – ch on;”
2. In M_Spine_curve chanel box we can find “Curve info” node select this node go to hyper Shade
3. Click on Input- output Connections
4. Drag out the “Curve info” node
5. Create 2 + 6 Multiply Divide nodes From Utilities and arrange like this
7. Select Curve info go to attribute Editor Copy “Arc length “ Value and past in Multiple Divider 02 –Input 2X .
8. Operation is Divide for Multiple Divider 01 and 02
9. Select all Main Spine Joints Except First Joint go to Hyper shade Graph Menu Add Selected To Graph and arrange
10.
11. Select Each jnt and copy Translate y value and past in the Multiple Divider –Input 2X in fornt of that jnt
12. Through connection Editor Connect the Curve info --Arc length to Multiple Divider 01 –Input 1X
13. Through connection Editor Connect the Multiple Divider 01 –output X
to Multiple Divider 02 –Input 1X
14. Through connection Editor Connect the Multiple Divider 02 –output X
To all Multiple Divider s –Input 1X
15. Through connection Editor Connect the all Multiple Divider s –output X
To all main spine jnts –translate Y
Then Check out The spine It Will Woks Same as PM Spline


